Sunday, 17 August 2014

Natalie Dormer Golden Globes inspired Beauty Makeup

I’ve already written a post about my general thoughts on this makeup and the application of the bald cap (for that post click here, to watch the video click here).
image
This post will be about the more wearable beauty side of the makeup, I mimicked her makeup for the evening, but chose to do a darker lip because I dig those.
So after applying the bald cap, I primed my face with a primer from Face of Australia, and concealed with the Makeup Forever concealer palette; I applied Rimmel’s Stay Matte foundation with a flat top brush (which I sprayed with MAC Fix+ so it would absorb less product). I chose this foundation solely because of how well it works on latex, but also it is on my list of foundations I currently use (I just love a matte face!).
I primed my eyelids with a, sort of, glittery/clear eyeshadow primer, also from Face of Australia I love this eye primer because it just adds an extra little touch of sparkle to your eyeshadow (which I feel like Natalie Dormer was wearing that night). All the eyeshadows were from the Urban Decay Naked 1 palette.
I used Virgin across the lid and as the inner corner and brow highlight. A combination of Naked and Buck in the crease (however a more orange-y brown may have been more appropriate, but I dulled it down with more Virgin). And Darkhorse across the rest of the lid and for the bottom lash line.
I elongated the arch in my brow to match hers using the Anastasia Beverlyhills Dipbrow in Blonde and lined my waterline with the NYX Wonder Pencil (and wonderful it is).
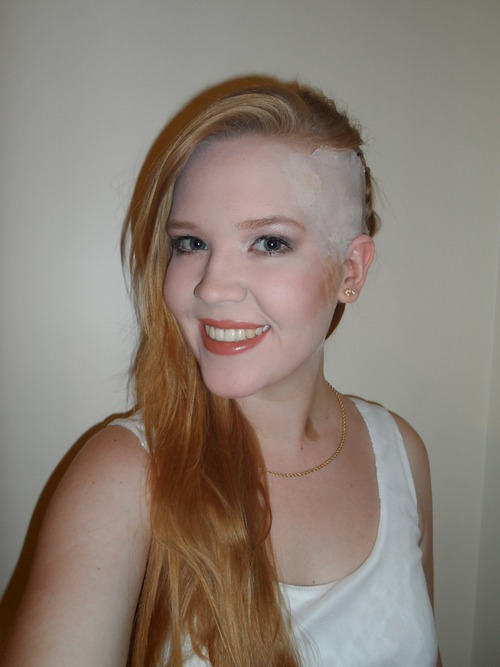
I tried to keep my blush light an my contour strong (unfortunately it got a little messy on the bald cap seam). I also just lined my lips with a brownish lip liner and put on a pink gloss.
This is a reasonably simple look but is still so gorgeous, and I think Nat Dormer (and myself) totally rocked it.

Wednesday, 13 August 2014

Natalie Dormer Golden Globes inspired Fake Undercut Makeup

When I saw the photos of Natalie Dormer at this years’ Golden Globes, I was instantly inspired, the look stuck me as edgy and and absolutely gorgeous! I decided to recreate her look without having to shave half my head, so I took a whack at creating a partial bald cap. I also mimicked her makeup for the evening, but chose to do a darker lip because I dig those. (Click here for the video, for a blog post about the wearable beauty side of the makeup click here.)
image
This makeup was very much an experiment…Without doing any research; I did it in a way that made sense to me. I began by making a bald cap in exactly the same way I usually make a bald cap, except only half of it (unfortunately I made it on the wrong side and had to start over, maybe I’ll do something with the other one one day).
My original plan for attaching the bald cap was to glue it to my face, toupee-tape it to the parting in my hair, and bobby pin it into my plait at the back. However, the bobby pin idea failed (the cap started to rip) and I ended up just toupee-taping it again (which worked fine, however I do wish it would have been tighter).
Overall, I’m really happy with how it worked out. The only changes I would’ve made are: trying to make the cap tighter (so I don’t have one of those bald guy walrus rolls above my ear), and of course that patch of makeup at my temple that just went white and couldn’t be fixed.
See, latex has this annoying quality of turning makeup white. I don’t know how, or why, but it does. You’ll see in the video that I put concealer on that part, to try and cover up some black pen lines made in the production of the cap. That was a mistake I won’t make again. It was infuriating editing the video and watching that patch just get whiter and whiter as time went on (watch it again and just watch the patch, you’ll see what I mean).
For the rest of the cap I used Rimmel’s Stay Matte foundation (I find that foundations advertised as “staying matte” don’t turn white on latex, as much), and my Skin Illustrator alcohol-activated Ink Palette (which are paints designed for prosthetics that won’t take regular makeup).
I did Photoshop the seam (and white patch) out of my video’s thumbnail, because there is almost zero ways to hide the edge of a bald cap with front-on flash photography (top lighting is always best).
Here is an unedited version (also flash photography can do funny things to the Alcohol Ink paints, it is not as mismatched as it appears):
image
And here is another unedited version of the same makeup, under top lighting:
image
(of course the background has been edited, but the makeup has not)
You can see how the seam on the appliance is much less visible.
(I never know how to end these things, but) I hope this has been useful/educational/interesting to you, and please don’t forget to thumbs up my video!
Thanks for reading!

Sunday, 10 August 2014

My process of making Spock Ear Prosthetic Casts

When the Star Trek remake came out in 2009 I fell in love with it. 4 years later when the sequel came out, I convinced my boyfriend to let me turn him into Spock. This is a blog post about how I made his ear casts.
I started with casting his ears in alginate and then making plaster positives, upon which to sculpt. I love sculpting but I always procrastinate doing it because I can do it for hours and hours, these sculpts took about 3 episodes of Veronica Mars’s worth of time.
I am completely satisfied with the finished product though.
image
I sculpted these with plasticine (which I usually hate), because I was trying a method of moulding which I had never done before; I didn’t know how long it would take, and I didn’t want my clay to dry out (should I had had to leave it over night).
After sculpting I prepared it for moulding; by filling in all the undercuts in the ear cast with clay, and making run-off channels.
image
I also left a few areas of the plaster clear to create “keys” for the mould to fit into, I did this on both sides.
The next step was to fill the container with plaster halfway and, once it was almost set, dig into it with tools to make keys for the top half to fit into.
image
As an extra stoke of genius on my part (if i do say so myself), I added snakes of clay along the edges and in the corners, the purpose of these being to make separating the two halves easier (if I hadn’t have done this, it would have been like trying to separate 2 bricks of lego).
And so, after much Vaseline over the surface of the plaster, it was time to pour the top half.
image
After waiting for the top half to set, I could pull them apart (in which the clay snakes I had made proved very useful indeed).
image
Moment of truth and… they came out almost perfect! The holes near the top of the ear points I did as a last minute thing, to use for pouring my silicone into, I’m not sure if it was a good idea, but we’ll see.
Just have to finish cleaning out the clay and we’re good to go!
image
I did have a minor breakage on the ear cast, but its easily fixed.
Can’t wait to do the makeup. Stay tuned…

Tuesday, 5 August 2014

I’m going to kick off this blog by talking about the first 2 videos I’ve uploaded.

These Behind the Scenes videos were filmed sometime last year when I had the opportunity to do a photo shoot in which a model and photographer would be provided, and I could do any makeup look I wished. I chose Glamour and Grunge. (click the links to see the videos)

image 
The Glamour makeup was a simple gold and black smokey eye, with a pink lip. (I tastefully edited out the bit where I put a different lip colour on, didn’t like it, and had to take it off). This is one of my favourite looks, and I had never done it on someone with her eye shape before. That’s one of the things I love about makeup, you can have one standard look and no one will ever wear it the same. Everybody’s different!

image 
The Grunge makeup was also a rather simple smokey eye, but a bit more full on. You’ll notice in the video, I go through many layers of placing colour on the eyes. I started off with a skin tone primer on the upper portion of the eye (from the crease to the eyebrow) and a darker cream eyeshadow as a base on the rest of the lid. Following this came many layers of purple in slightly different shades to create depth in the eye (we do not have, or want, flat eyes). I then smudged a MAC Khol eyeliner in black, to create ever more definition, along the lash line, then blended it out some, with more purples. Unfortunately my camera ran out of battery and I missed the filming of the lips, cheeks, and brows, but they were all fairly simple. This was an extremely fun look for me, I’ve always liked the “Grunge look” but, it’s not the type of thing I could pull off.

Please check out my videos and give me a thumbs up! :)